


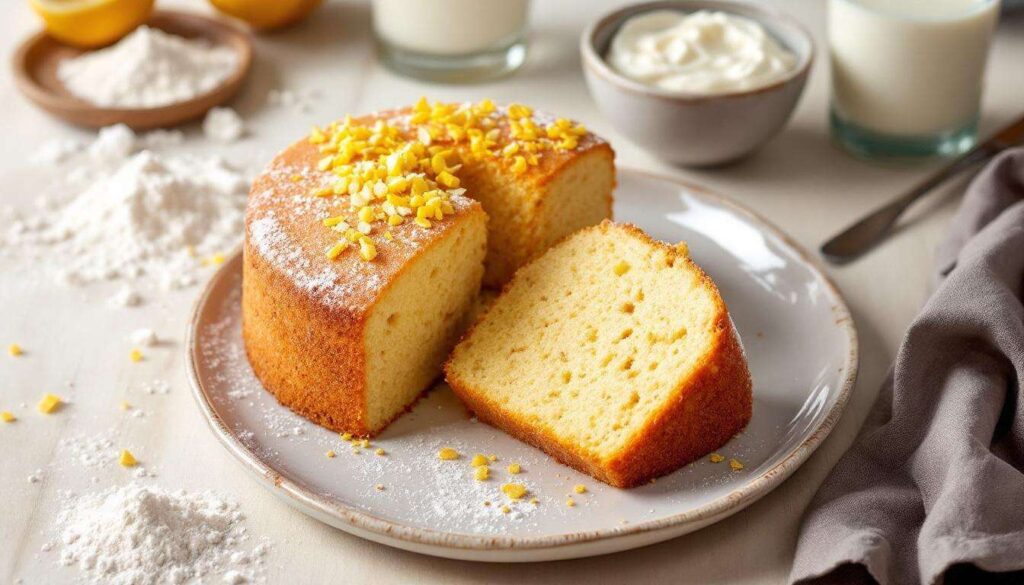
In an era where health-conscious eating meets culinary pleasure, this ultra-light diet cake emerges as a game-changer for dessert lovers seeking to maintain their wellness goals without sacrificing taste. This revolutionary recipe transforms traditional baking by replacing heavy ingredients with smart alternatives that deliver exceptional flavor while keeping calories remarkably low.
Developed through careful experimentation with modern baking science, this cake proves that indulgence doesn’t require compromise. The secret lies in understanding how ingredients interact, creating a tender crumb and satisfying sweetness that rivals any conventional cake. Perfect for afternoon tea, celebrations, or simply treating yourself, this dessert represents a new approach to guilt-free baking that everyone can enjoy.
15
35
easy
€
Ingredients
Utensils
Preparation
1. Prepare your workspace and preheat
Begin by preheating your oven to 350°F (175°C). This step is crucial because a properly heated oven ensures even baking and the right texture. While the oven heats, prepare your 8-inch round cake pan by lining the bottom with parchment paper and lightly coating the sides with cooking spray. This prevents sticking and ensures your cake releases perfectly once baked.
2. Combine the dry ingredients
In a medium mixing bowl, sift together the all-purpose flour, baking powder, and salt. Sifting is the process of passing dry ingredients through a fine mesh to remove lumps and incorporate air, which creates a lighter texture in your final cake. Add the lemon zest to this mixture and whisk everything together for about 30 seconds to distribute the ingredients evenly. Set this bowl aside while you prepare the wet ingredients.
3. Whip the egg whites to perfection
In a clean, dry bowl, add the three egg whites. Using your electric hand mixer, begin beating them on medium speed for about one minute, then increase to high speed. Continue beating until the whites form stiff peaks, meaning when you lift the beaters, the peaks stand upright without drooping. This process takes approximately 3-4 minutes and is essential for creating the cake’s airy structure. The trapped air bubbles will expand during baking, giving your cake its light, fluffy texture.
4. Mix the remaining wet ingredients
In another bowl, combine the unsweetened applesauce, non-fat Greek yogurt, granulated sweetener, vanilla extract, and almond milk. Whisk these ingredients together vigorously for about one minute until the mixture becomes smooth and homogeneous. The applesauce replaces traditional oil or butter, providing moisture without added fat, while the Greek yogurt adds protein and creates a tender crumb. The sweetener dissolves into the liquid ingredients, ensuring even sweetness throughout your cake.
5. Fold the dry ingredients into the wet mixture
Pour the flour mixture into the bowl containing your wet ingredients. Using a spatula, gently fold them together using a sweeping motion from the bottom of the bowl upward. Folding is a gentle mixing technique that preserves air in the batter, unlike stirring which can deflate it. Continue this motion just until no flour streaks remain visible, being careful not to overmix. Overmixing develops gluten strands that create a tough, dense cake rather than the tender texture we’re seeking.
6. Incorporate the whipped egg whites
Now comes the most delicate step. Add one-third of your whipped egg whites to the batter and fold gently to lighten the mixture. This initial addition makes it easier to incorporate the remaining whites without deflating them. Add the remaining egg whites in two more additions, folding carefully after each. Use broad, sweeping motions and work quickly but gently. You should see some white streaks remaining, which is perfectly fine. The goal is to maintain as much air as possible while achieving a relatively uniform batter.
7. Transfer to the pan and bake
Pour the batter into your prepared cake pan, using your spatula to scrape every bit from the bowl. Gently tap the pan on your counter two or three times to release any large air bubbles that could create holes in your finished cake. Place the pan in the center of your preheated oven and bake for 30-35 minutes. The cake is done when it springs back lightly when touched in the center and a toothpick inserted comes out clean or with just a few moist crumbs attached.
8. Cool properly before serving
Once baked, remove the cake from the oven and let it rest in the pan for exactly 10 minutes. This resting period allows the structure to set without becoming soggy. After 10 minutes, run a thin knife around the edges to loosen any spots that might stick, then invert the cake onto a cooling rack. Remove the parchment paper from the bottom and flip the cake right-side up. Allow it to cool completely, which takes about one hour. Cutting into a warm cake can cause it to crumble and lose its delicate texture.
Chef’s tip
For an even lighter texture, separate your eggs when they’re cold from the refrigerator, but let the whites come to room temperature before whipping. Room temperature egg whites whip to greater volume and create more stable peaks. If you’re watching carbohydrates closely, substitute half the flour with almond flour for added protein and a subtle nutty flavor. To enhance the lemon flavor without adding calories, add a tablespoon of fresh lemon juice to the wet ingredients. For a chocolate version, replace 30 grams of flour with unsweetened cocoa powder and add an extra tablespoon of almond milk to compensate for the cocoa’s drying effect.
Refreshing beverage pairings
This ultra-light cake pairs beautifully with beverages that complement rather than overwhelm its delicate flavor profile. Herbal teas make excellent companions, particularly chamomile or mint varieties served either hot or iced. The subtle sweetness and aromatic qualities enhance the cake’s vanilla and lemon notes without adding calories.
For coffee lovers, a light-roast coffee or a cappuccino made with skim milk maintains the health-conscious theme while providing a pleasant contrast to the cake’s sweetness. Cold brew coffee, which has lower acidity than traditional hot-brewed coffee, offers a smooth, mellow flavor that won’t compete with the cake’s subtle taste. Sparkling water infused with fresh lemon or cucumber provides a refreshing, zero-calorie option that cleanses the palate between bites.
Extra tip
The concept of guilt-free desserts gained momentum in the early 2000s as nutritional science advanced and consumers became increasingly aware of the connection between diet and health. Traditional cake recipes typically contain significant amounts of butter, oil, and sugar, contributing to high calorie counts that can derail dietary goals.
This ultra-light version represents years of culinary innovation, drawing on techniques from both professional pastry kitchens and home baking enthusiasts. The use of applesauce as a fat substitute dates back to wartime rationing periods when ingredients were scarce, though modern applications focus on health benefits rather than scarcity. Greek yogurt’s incorporation reflects contemporary understanding of protein’s role in satiety and muscle maintenance.
The science behind this recipe relies on creating structure through whipped egg whites rather than fat, a technique borrowed from angel food cake and French meringue traditions. Each serving contains approximately 120 calories compared to 350-400 calories in traditional cake, making it possible to enjoy dessert while maintaining a caloric deficit for weight management. The high protein content from egg whites and Greek yogurt also helps stabilize blood sugar levels, preventing the energy crashes associated with sugar-heavy desserts.